Lightroom Presets: How to Create and Use Them
You know that editing is a crucial part of the creative process. But it can also be incredibly time-consuming. That's where Lightroom presets come in—they are one of the most powerful tools you can use to streamline your workflow, save time, and achieve a consistent, professional look across all of your images. ⚡

What Exactly is a Preset?
Think of a Lightroom preset as a "saved" edit. It's a collection of adjustments—like changes to exposure, contrast, color, and tone—that have been recorded so they can be applied to any photo with a single click. Instead of manually moving every slider for every single photo, a preset does all the work for you, giving you an instant head start on your editing.
Finding and Using Presets
Lightroom Classic and Lightroom CC both come with a wide selection of built-in presets that are perfect for beginners. You can find these in the Develop Module (in Lightroom Classic) or the Edit Panel (in Lightroom CC). Simply scroll through the available presets to see a live preview of how each one will affect your photo.

To apply a preset, just click on it. You can also hover over the different presets to get a quick visual of what your image will look like without committing to the change. This allows you to quickly find the perfect starting point for your edit.
The Benefits of Using Presets
Massively Saves Time: This is the most significant benefit. What might take you 15 minutes of manual editing can be done in one click, freeing you up to spend more time on shooting, client work, or other creative endeavors.
Creates Consistency: If you're building a brand or a portfolio, consistency is key. Using a signature set of presets can help you achieve a cohesive look and feel across your entire body of work, making your style instantly recognizable.
A Great Learning Tool: By applying a preset, you can see exactly which sliders and settings were adjusted. This is a fantastic way to learn what specific adjustments do and how they work together to create a certain look.

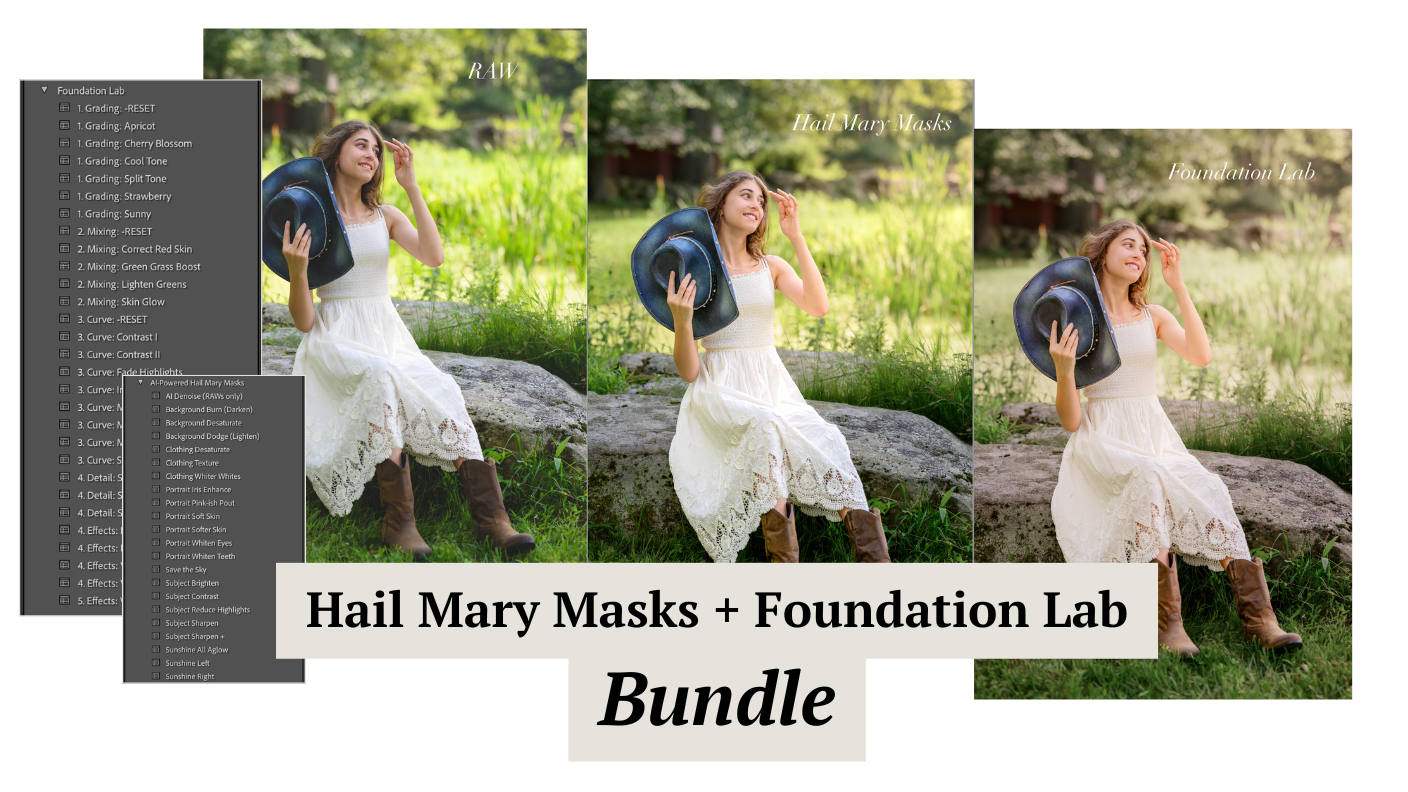
Nancy’s Preset Bundle is a complete, one-click solution that combines foundational adjustments to the tone curve, color grading and mixing, with AI-powered masks to help you stop wasting hours editing and start creating.
You can learn more and purchase my handmade presets here: The Bestselling Preset Bundle. 🚀
Tweaking Your Presets for the Perfect Look
Presets are a fantastic shortcut, but they are not a "one-size-fits-all" solution. Every photo has unique lighting, colors, and composition. The best approach is to use a preset as your foundation and then make small, final adjustments.
You can use the new "Amount" slider at the top of the presets panel to quickly reduce or increase the intensity of a preset's effect.

You'll also find that most of your fine-tuning will happen in the Basic Panel. For example, you might need to adjust the exposure, shadows, or highlights to compensate for the specific lighting in your photo. Making these minor tweaks is still much faster than a full manual edit. For those final crucial adjustments, Nancy’s presets have 33 Fine-Tuning Presets to take your image from good to breathtaking. ✨
How to Create Your Own Presets
Once you have a style you love, you'll want to save it as your own custom preset. This is an essential step for building an efficient and personalized workflow.
Edit Your Photo to Perfection: Start with a photo and make all the adjustments you want to include in your preset.
Create a New Preset: In Lightroom Classic, go to Develop > New Preset or click the plus icon in the Presets panel and select Create Preset....
Name and Configure: Give your new preset a name and choose which settings you want to include. For example, you can uncheck things like Crop or Lens Corrections if you don't want them to be a part of the preset.
Save: Click "Create" and your new preset is now saved and ready to use.

By learning how to use and create your own presets, you can take control of your editing process, achieve a consistent aesthetic, and most importantly, get more of your valuable time back. If you're looking for a professional and comprehensive set of presets to get started, you can find them here: Nancy’s AI-Powered Hail Mary Masks.
Needing to dive deeper? Check out…
The Lightroom Series for editing.
AI-Powered Hail Mary Masks for lightning fast, unmatched editing tools.
The Camera Series for comprehensive and affordable trainings suitable for beginner or intermediate photographers.
Nancy’s Recommended Gear and where she buys it used (reputable with warranties!)